How to Blur Something in a Video (5 Methods + Free Tool)
If you are trying to figure out how to blur something in a video, your options boil down to three paths: free online tools, professional desktop blur video software, and modern AI-powered platforms. While each has its place, AI tools have become the go-to for most creators—fast, trackable results when you need to blur faces in video or redact plates at scale. Blurit and Blurit Studio sit in that third camp: browser workflows built for privacy-first publishing.
TL;DR: Pick AI + tracking when subjects move; pick desktop NLEs (Premiere, DaVinci) when you need heavy creative finishing; avoid random upload sites for sensitive footage. Match blur vs pixelate vs solid mask to your risk level—and always export a baked-in redaction, not a reversible filter.
Why Blurring Videos Is Now a Critical Skill
Ever found yourself needing to protect someone's privacy in a video? The sheer volume of online content, combined with strict privacy laws like GDPR, has made redacting videos an urgent priority. This is not only for professional editors—it is part of responsible publishing for anyone who shares footage publicly. Many teams also need a dependable way to blur video online without shipping raw files to unknown servers.
The reasons are straightforward:
- Protecting people: Blurring faces, names, or license plates prevents accidental doxxing and respects people who did not consent to be on camera.
- Avoiding legal trouble: Businesses and journalists can face penalties for publishing unredacted content that violates data protection rules.
- Securing information: Companies blur proprietary information, internal documents, or unreleased products in corporate or marketing videos.
- Guiding viewer focus: Creators use blurring creatively—softening the background so the subject reads clearly on small screens.
Whether you are blurring a face for privacy, blurring the background to keep attention on your subject, or you need to pixelate a video for stronger anonymity, the same rule applies: choose the method before you export, then validate the file you actually publish.
How Video Blurring Has Changed
Anonymizing video is not new. Broadcasters in the 1950s used crude manual techniques. After Ampex introduced the first commercial videotape recorder in 1956, editors spent hours altering tape to hide identities—a slow, expensive process.
The challenge today is scale. With over 500 hours of video uploaded to YouTube every minute, manual methods are impractical. You can read more about early editing history on Vodpod.com. That explosion of content pushed automated, AI-driven solutions—and products like Blurit now focus on detection plus tracking so you are not keyframing masks all afternoon.
Blurring or pixelating content is not always foolproof. Research suggests that with enough frames of moving video, some blur effects can potentially be reversed. For irreversible redaction, a solid black box remains the most secure method.
Modern Tools for a Modern Problem
Today’s demand for fast anonymization has produced a new generation of tools. Desktop software like DaVinci Resolve or Premiere Pro gives granular control; AI platforms automate detection and tracking so you can ship edits on deadline. Whether you are editing social clips or sensitive security footage, knowing how to blur a video responsibly is now baseline literacy—and teams increasingly pair NLE finishing with a dedicated blur video free or freemium tier for redaction passes.
Comparing Video Blurring Methods
You need to blur something in a video—where do you start? Your tool choice is the difference between a quick professional result and hours of frustration. Paths cluster into: lightweight web editors, heavyweight blur video software on desktop, and AI-first platforms such as Blurit.
For a one-off job, many people search for a free video blur tool. Browser editors can work for a static plate in a short clip—but they often struggle with motion, offer limited quality control, and may require uploads to infrastructure you cannot assess. That is a problem when footage is confidential.
Understanding the Trade-offs
At the other extreme, Adobe Premiere Pro or DaVinci Resolve deliver total creative freedom with manual keyframing—ideal when blur must match a graded master. The catch is time: tracking a face or car frame-by-frame is slow even for experienced editors, which is why AI redaction tools are popular for blur moving objects in long clips.
This decision often comes down to privacy: if the video goes public, protecting private information is not optional.
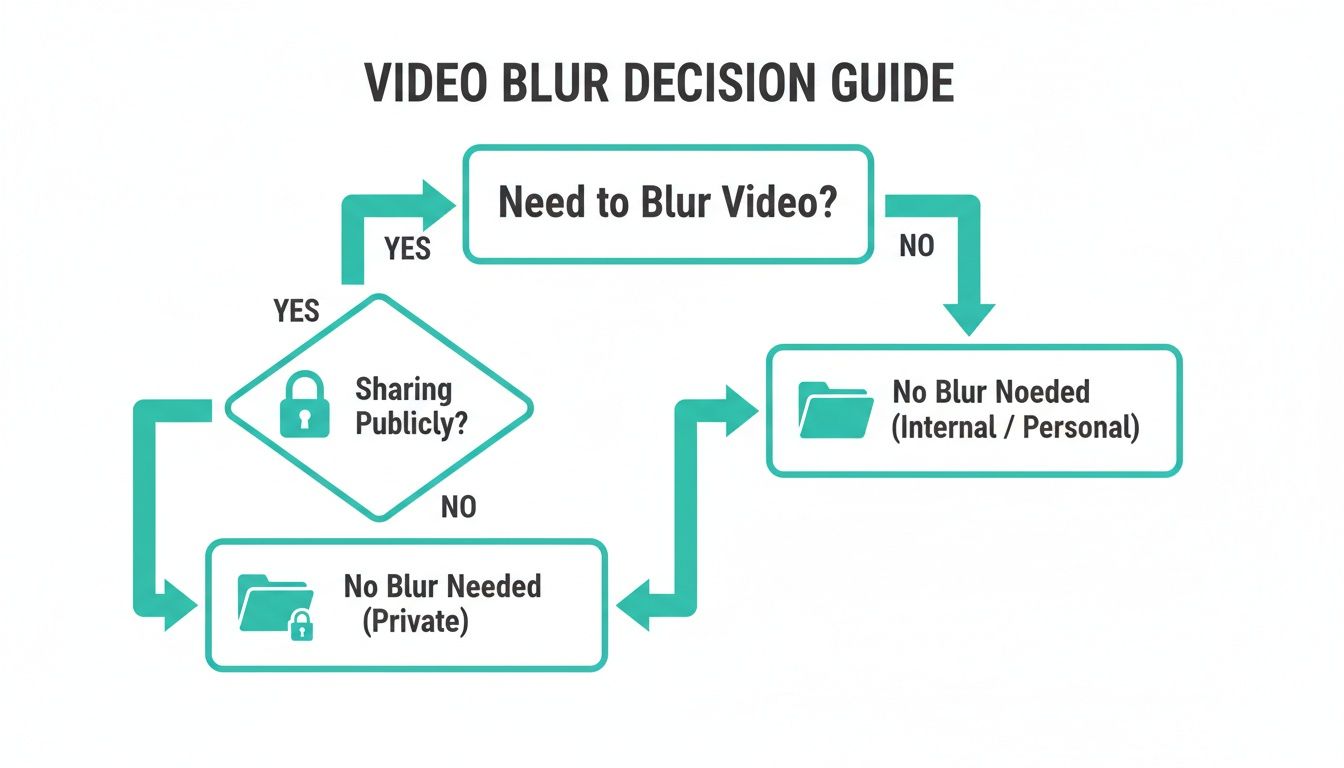
As the chart shows, audience-facing content usually demands documented redaction—not a last-minute crop.
The Rise of AI Platforms
This is where AI-powered platforms like Blurit fit: a practical middle ground between speed and control. They use AI to find and track faces, license plates, and objects across frames—turning a tedious job into a short review. Open Blurit Studio when you want to test that workflow on real footage; the product is built so teams can iterate without installing a suite first.
AI tools reduce human error—like missing a face in a crowd—while modern stacks keep processing expectations clear. Always read the provider’s privacy policy before you upload sensitive material.
Here is how common approaches compare for day-to-day work.
Video Blurring Method Comparison
| Feature | Free online tools | Desktop software (e.g., Premiere) | Blurit (AI platform) |
|---|---|---|---|
| Speed | Slow uploads; poor for moving subjects. | Very slow for manual tracking. | Fast: automatic detection and tracking in minutes for typical clips. |
| Accuracy | Often weak on motion (“blur leaks”). | High if your keyframes are perfect—depends on skill. | High: AI tracks objects across frames with review before export. |
| Ease of use | OK for static boxes; clunky beyond that. | Steep learning curve. | Simple three-step workflow in the browser. |
| Security | Often requires cloud upload to unknown vendors. | Local files stay on your machine. | Designed for privacy-sensitive workflows—confirm terms for your use case. |
| Cost | Free but limited. | Subscriptions or licenses. | Flexible tiers; try Blurit Studio to validate fit. |
Ultimately, the best method depends on your project. One-time static blur with no sensitive data might work in a simple web tool. High-end finishing still lives in NLEs. For many privacy-heavy workflows—deadlines plus motion—Blurit is built to combine speed, accuracy, and a repeatable review loop. Compare plans on pricing when you move from experiments to production volume.

A Practical Guide to Blurring a Video with AI
Here is how to blur something in a video with a modern AI workflow—what used to take hours of masking can be a short review in Blurit. The point is automation: detection and tracking first, creative decisions second.
Step 1: Upload Your Video
Bring your file into the tool. With Blurit, you work in the browser—no installer required for the core Studio flow. Drag and drop your clip, then confirm formats and duration match your delivery spec.
Before uploading sensitive footage, read the provider’s privacy policy: cloud processing, retention, and subprocessors matter for GDPR and internal security reviews. If you compare against pure blur video software on a workstation, the trade-off is usually IT control vs. collaboration speed—pick what your policy allows.
Step 2: Let the AI Detect and Blur
Once loaded, choose what to anonymize. Typical targets:
- Faces: automatic detection across the timeline.
- License plates: common for street-level and fleet footage.
- Custom objects: draw a region once and let tracking follow it.
The system scans the clip and applies blur or pixelation while following motion—a major upgrade over manual keyframes when you must blur faces in video consistently.
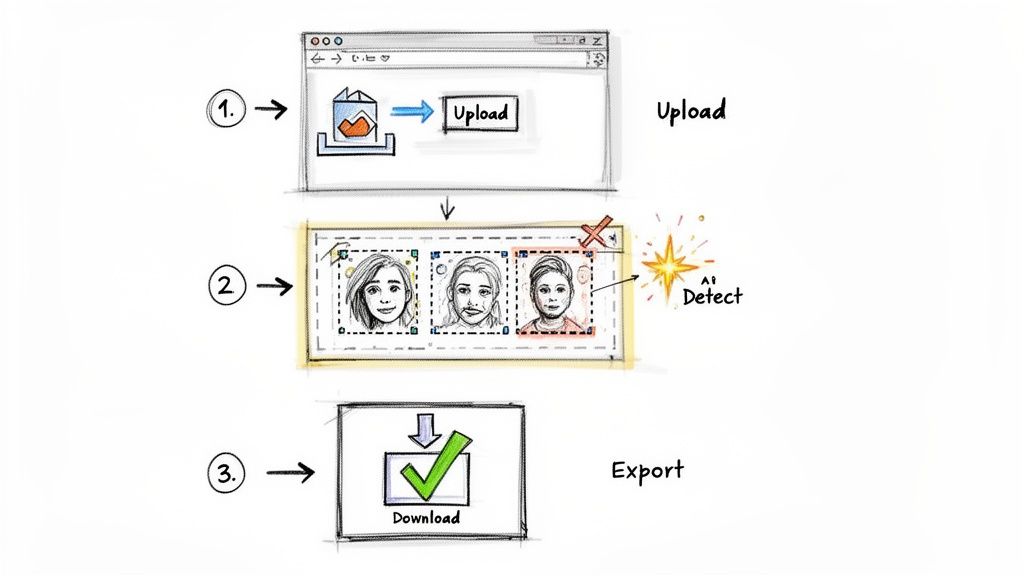
Step 3: Review and Export Your Anonymized Video
Playback the preview, fix false positives, and adjust intensity or method per region. Many workflows let you keep one face sharp while hiding others—useful for interviews. When satisfied, export a baked redaction so pixels are destroyed in the delivered file, not hidden behind a reversible overlay.
Pro tip: For group shots, verify edges frame-by-frame at cuts and fast motion—where automated masks most often slip.
Try the three-step workflow in Studio
Upload, review detections, export—built for teams that need repeatable video redaction.
Start in Blurit StudioChoosing Your Blurring Style: Blur vs. Pixelation vs. Mask
Knowing you need to hide something is only the start—you must pick how. Blur, pixelation, and solid masks balance aesthetics, context, and security differently. If you need to blur a face with maximum certainty, pairing method choice with export discipline matters more than any single filter slider.
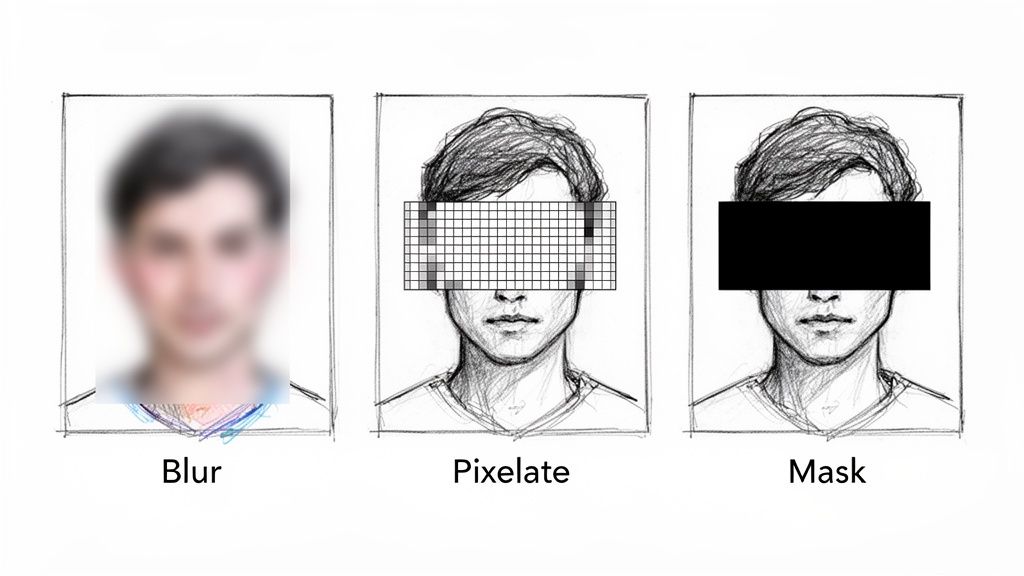
Standard Blur
Gaussian-style blur averages pixels for a soft look—great for backgrounds and mild obscuring. Security level is lower: heavy blur helps, but advanced restoration attacks are a concern on video with many frames.
Pixelation
Pixelation replaces detail with coarse blocks—common in news. If blocks are too fine, research shows reconstruction risk across frames. When in doubt, go coarser for pixelate video deliverables.
Solid Mask
A 100% opaque box removes underlying pixels in the exported file—strongest choice for compliance-grade anonymity. Use it when identity must not be recoverable from the published asset.
Advanced Anonymization Workflows for Professionals
When you handle journalistic evidence, confidential CCTV, or legal files, consumer filters are not enough. Professionals need precision, security documentation, and repeatable exports. Large files—sometimes 10 GB or more—require stable pipelines. Selective anonymization (for example, blurring a crowd while keeping a primary subject) is a narrative tool as much as a privacy control.
Securing Your Workflow End to End
For legal and security teams, data handling decides whether a tool is admissible. Blurit emphasizes transparent workflows—still verify subprocessors, regions, and retention against your DPIA. Combine strong methods (including solid masks when required) with policies on who may export and where masters live.
Document the chain of custody: what was redacted, which version was published, and which raw remains restricted.
Practical Use Cases
- Newsrooms: protect bystanders while preserving a whistleblower when permitted.
- Legal: mask bystanders in evidence clips submitted under court rules.
- Corporate security: blur screens and documents before external investigators see footage.
For more background on scaling redaction, browse the Blurit blog and the censor photo online guide—many GDPR-minded checks apply to video too.
Practical Video Blurring FAQs
Common questions when you first anonymize footage—answered plainly.
Start with a reputable workflow: many teams use a free tier or trial in an AI tool to test detection quality, then upgrade for batch exports. Avoid unknown upload sites for confidential clips—read privacy terms first. Blurit Studio offers a path to try automated blur without a heavy NLE install.
Use AI motion tracking instead of manual keyframing. Mark the subject once (or rely on automatic face detection), review suggestions, then export. That is orders of magnitude faster than dragging masks frame-by-frame in traditional blur video software.
Manual keyframing works but is slow and error-prone. Practical approach: AI tracking—identify the object once and let the model follow it. This reduces “blur leaks” where the subject flashes visible for a frame.
Properly baked blur or pixelation in the exported file should destroy detail in that render—but research shows risks from weak effects across many frames. For irreversible redaction, use a solid mask in the delivered asset.
Use a solid mask when identity must not be recovered, and choose a workflow with clear data-handling terms. Pair technical redaction with platform rules and your legal counsel’s advice for public-facing releases.
See our guides on how to blur a background and how to pixelate a video for complementary techniques.