Master Roto Brush in After Effects for Perfect Cutouts
If you've ever tried to cut a moving subject out of a video, you know the pain of traditional rotoscoping. Manually tracing an outline, frame by agonizing frame, is one of the most tedious tasks in all of video editing. It's the kind of work that makes you question your career choices.
That's where After Effects' Roto Brush tool comes in. It's a powerful, semi-automated feature designed to do the heavy lifting for you, turning hours of masking into minutes of refinement. This guide provides a practical, step-by-step approach to mastering it.
What Is Roto Brush and Why Does It Matter?
Think of the Roto Brush as your secret weapon for creating clean cutouts when you don't have the luxury of a green screen. It lets you separate a foreground subject—like a person walking, a car driving, or a product in motion—from its background with surprising speed.
Instead of drawing precise masks, you just roughly paint over your subject on a single frame. From there, After Effects analyzes the footage and intelligently tracks the subject's movement, propagating your selection forward and backward through the timeline. This makes complex compositing work, like replacing a sky or applying an effect to just one person in a crowd, accessible to everyone.
From Manual Pain to Semi-Automated Gain
Before the Roto Brush showed up around 2010, rotoscoping was purely manual work, relying on meticulous splines and masks. It was a specialized skill reserved for patient VFX artists with a lot of time on their hands.
The tool completely changed the game. Early benchmarks showed it could reduce manual rotoscoping time by as much as 80%. Suddenly, tasks that were once prohibitively expensive or time-consuming became practical for motion designers, small studios, and even YouTubers. For a deeper dive into its features, you can always check out Adobe's official Roto Brush guide.
The Roto Brush has evolved quite a bit since its first release. Understanding the differences can help you know which version you're working with and what to expect.
Rotobrush Versions At a Glance
The original Roto Brush was a massive step up, but Adobe has continued to refine the technology, most notably with the introduction of Rotobrush 2. Here's a quick breakdown of how the tool has improved over the years.
| Version | Key technology | Primary improvement |
|---|---|---|
| Rotobrush 1 | Content-Aware Edge Detection | First-generation semi-automated tracking. Good, but required lots of manual correction on complex shots. |
| Rotobrush 2 | Adobe Sensei AI | AI-powered object tracking that propagates frames much more intelligently and accurately, reducing manual cleanup. |
| Rotobrush 3 | Enhanced AI Model & Refinements | Further improved AI for better subject detection, especially with occlusions and tricky lighting, plus better handling of motion-blurred edges. |
Essentially, each new version has gotten smarter and more reliable, leaning more heavily on AI to understand and track your subject. This means less time spent correcting the tool's mistakes and more time focusing on your creative vision.
What's the Big Deal?
So, why has this tool become such a staple in the modern post-production workflow? The benefits are pretty clear once you start using it.
- Incredible Speed: It turns a multi-hour rotoscoping marathon into a quick session of painting and refining. It's the single biggest time-saver for this kind of work.
- Easy to Learn: The "paint and check" workflow is far more intuitive than wrestling with Bezier handles and keyframing mask paths. Newcomers can pick it up in minutes.
- Ultimate Flexibility: It's a lifesaver for footage shot on location where a green screen was impossible, like documentary interviews, live events, or run-and-gun B-roll.
- Unlocks Creativity: Once an element is isolated, the creative possibilities are endless. You can place your subject in a new environment, apply targeted color grades, or create complex interactions between live footage and graphics.
In short, the Roto Brush tool democratized high-quality compositing. It's the bridge that connects basic masking to the kind of professional visual effects that used to be out of reach for most creators.

Your First Rotobrush Project: A Practical Workflow
Alright, enough theory. Let's dive into a real-world workflow and get your hands dirty with the Roto Brush tool in After Effects. We'll go from a raw clip to a cleanly isolated element, ready for compositing.
Imagine you've got footage of someone walking down a busy city street. The goal is simple: cut them out so you can swap the background or apply an effect only to the person. This is the perfect job for the rotobrush after effects workflow.
Initial Setup and First Strokes
First, get your footage into After Effects and drop it into a new composition. The Roto Brush only works in the Layer panel, not the main Composition panel. To open it, just double-click your video layer on the timeline.
Now, follow these steps:
- Select the Roto Brush Tool: Grab it from the toolbar at the top (or press Option+W / Alt+W). Your cursor will become a green circle.
- Choose Your Base Frame: Scrub through the timeline to find a frame where your subject is fully visible and clearly defined. This is your starting point, or base frame.
- Paint the Foreground: Click and drag a green stroke inside your subject. Don't trace the edges; just give After Effects a solid idea of what to keep. It will analyze the area and snap a magenta segmentation line around what it thinks is the edge.
Pro Tip: Hold Cmd (Mac) or Ctrl (Windows) and drag your mouse left or right to resize your brush on the fly. A big brush is perfect for the first pass, while a smaller one gives you the precision needed for cleanup.
Correcting the Selection with Background Strokes
After Effects' first guess is almost never perfect. It might grab a chunk of the background or miss a part of your subject. To fix this, hold down the Option (Mac) or Alt (Windows) key. Your cursor will flip to a red circle, which is the background brush.
Simply paint with the red brush over any background areas that were accidentally included. The magenta line will instantly update. Keep switching between the green (foreground) and red (background) brushes until the line hugs your subject tightly on this base frame.
This simple green-and-red stroke system was a game-changer. By 2020, its efficiency was so undeniable that over 70% of motion designers called it their primary tool for subject isolation. It's now used everywhere, from blurring faces in documentaries to isolating evidence in CCTV footage. You can get a deeper look at its professional history in this detailed guide to rotoscoping.
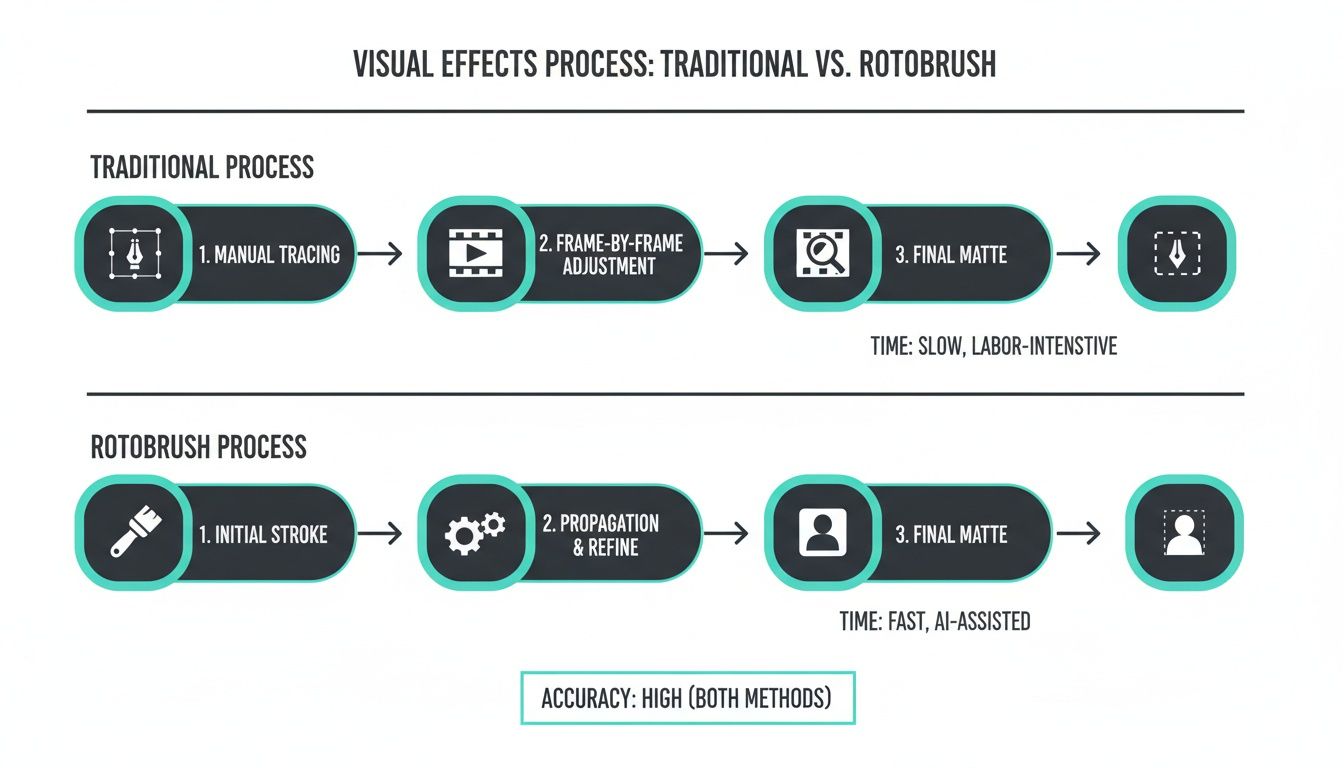
This flowchart really puts into perspective how much Roto Brush streamlines the painful, old-school rotoscoping process.
As you can see, the tool swaps tedious, frame-by-frame manual tracing for an intuitive "paint and track" system. It's a massive reduction in the time and labor required to get a clean matte.
Refining Your Matte for Professional Results
Getting a rough selection with the Roto Brush is just the first step. The real art, the thing that separates a decent roto from a professional one, happens during the refinement stage. This is where you turn a jagged, obvious cutout into a seamless composite that truly sells the shot.
Your initial pass will get you a magenta outline, but it's almost guaranteed to be messy, especially around tricky details like flyaway hair, soft fur, or semi-transparent fabrics. The base Roto Brush just isn't built for that level of subtlety on its own.
This is your cue to switch over to its companion, the Refine Edge tool. Hold down the Roto Brush icon in the toolbar and select it (or hit Alt+W / Option+W again). Now, instead of defining the main shape, you're painting over the problem areas like hair or blurred edges. This tells After Effects to take a second, much closer look at those specific pixels to better distinguish the foreground from the background.
Mastering the Refine Matte Controls
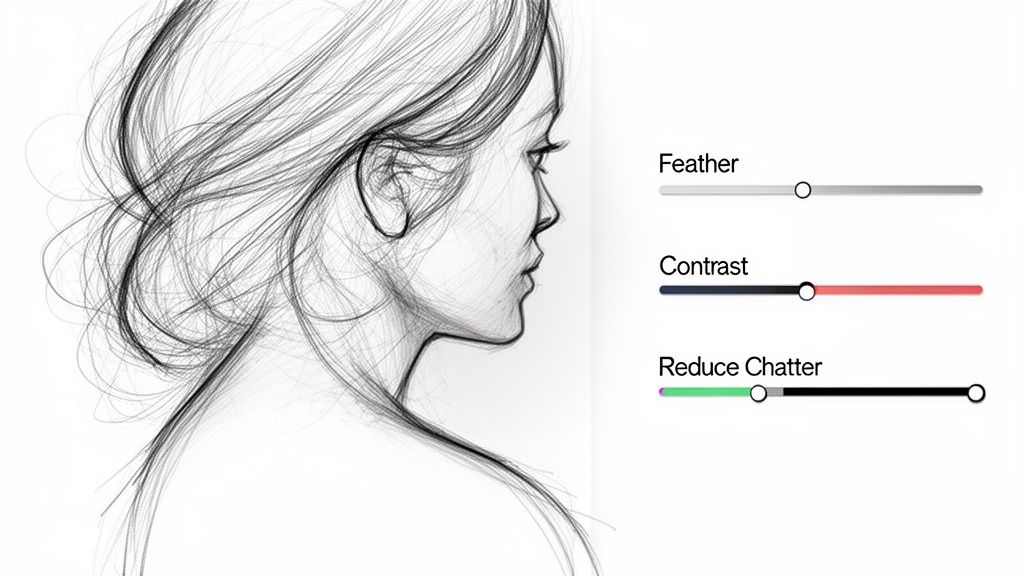
Painting with the Refine Edge tool is just part of the process. The real power move is dialing in the settings in the Roto Brush & Refine Matte effect panel. These sliders are your mission control for transforming a chunky, amateur edge into a smooth, believable matte.
Let's walk through a common scenario. Say you've rotoscoped someone with wispy hair against a bright sky. Your first pass probably looks like a solid helmet of a matte around their head. Here's how you fix it:
- Feather: This is your go-to for softening the matte's edge. A small value, like 2-5 pixels, can instantly kill that sharp, "cutout" look.
- Contrast: If the feathering makes your edges too soft and blurry, bumping up the contrast tightens them back up. It's a constant balancing act between these two to find a natural-looking falloff.
- Shift Edge: This control is a lifesaver. It expands or contracts your entire matte. If you're seeing a persistent, thin halo of the background color, use a negative value (like -15%) to choke the matte inward and eliminate it.
- Reduce Chatter: This might be the most important one. "Chatter" is that annoying, jittery flicker you see along the edge from one frame to the next. Increasing this value—20-50% is a solid starting point—averages the edge position across multiple frames for a much more stable and professional result.
These settings are absolutely not "set it and forget it." The workflow is to make a small tweak, then scrub through the timeline to see how it affects the matte in motion. What looks perfect on frame 10 might fall apart by frame 50.
Troubleshooting Common Edge Problems
Even with the right settings, you'll hit roadblocks. A classic problem is motion blur. When your subject moves quickly, their edges become semi-transparent, and the Roto Brush has a hard time figuring out where the line should be.
Here's a practical fix:
- Locate the Use Motion Blur checkbox in the Refine Matte settings. Enable it.
- After Effects will analyze the clip for motion blur and try to create a more realistic, soft matte to match.
- If the effect is too strong or weak, adjust the Motion Blur Compensation slider to fine-tune how aggressively it's applied.
By carefully pairing the Refine Edge tool with smart adjustments in the matte settings, you can elevate your rotoscoping from a simple cutout to a polished, professional composite. It's that attention to the edges that makes all the difference.
Optimizing Performance and Troubleshooting Common Issues
Let's be honest: the Roto Brush after effects workflow is powerful, but it can bring even a beefy machine to its knees. Because it analyzes so much pixel data, knowing how to manage performance isn't just a nice-to-have—it's the key to finishing your project without wanting to throw your computer out the window.
One of the most common frustrations is when the Roto Brush stops tracking your subject accurately. This usually happens when the tool loses its reference point due to fast motion, a motion blur spike, or another object briefly getting in the way.
A simple, practical workaround is to break up your shot into smaller, manageable chunks. Instead of trying to propagate the entire clip in one go, just track for 20-30 frames. Stop, make any small corrections needed with the foreground/background brushes, and then let the tool propagate again from that new, solid reference frame. It keeps the tracking accurate and stops the algorithm from getting lost.
Your Best Friend The Freeze Button
Once you've propagated your selection and you're happy with the matte, you have to hit the Freeze button. You can find it at the bottom right of your Layer panel, and it is absolutely your ticket to better performance.
When you click Freeze, After Effects locks in all your Roto Brush and Refine Edge data by caching it to your disk. This does two brilliant things for you:
- First, it saves you from accidentally messing up hours of work with a stray mouse click.
- More importantly, it stops After Effects from re-calculating the entire matte every single time you scrub the timeline or hit play. The result is a massive improvement in playback speed.
Think of Freeze as baking your rotoscope. Once frozen, all the complex math is done. After Effects can now treat the matte like a simple video file, which makes everything else you do in your composite feel snappy again.
Pro Performance and GPU Tips
Beyond freezing, a few other tricks can keep your workflow fluid, especially when you're dealing with long clips or 4K footage. If things are grinding to a halt, it's almost always related to your preview settings or how After Effects is using your hardware.
If your system is chugging, try these adjustments right away:
- Lower Your Preview Resolution: In the Composition panel, switch the resolution from Full down to Half or even Quarter. The Roto Brush now has far fewer pixels to analyze, which speeds up both your initial painting and the propagation itself.
- Draft in 'Fast' Quality: Inside the Roto Brush & Refine Matte effect controls, you'll find a Quality dropdown. Set this to Fast while you're getting the basic shape of your matte down. It uses a simpler, quicker algorithm for instant feedback. You can always switch it back to Best right before you freeze or render.
- Put Your GPU to Work: Double-check that your GPU is properly enabled by going to File > Project Settings > Video Rendering and Effects. Modern versions of Roto Brush lean heavily on the GPU for acceleration, and getting this setting right can make a night-and-day difference in speed.
By combining these tactics—working in small segments, freezing your matte, and tweaking your preview settings—you can tame the Roto Brush and get back to the creative work, not waiting for your progress bar.
Beyond Roto Brush: Alternative & Complementary Tools
While the native Rotobrush in After Effects is a true workhorse, it's not always the only tool for the job. The world of visual effects is packed with powerful alternatives and complementary software. Knowing when to step outside the standard toolkit can save you hours of tedious work and often deliver far better results.
Sometimes, a different approach isn't just better—it's smarter.
Think about it: not every rotoscoping job involves isolating a person or another complex, organic shape. What if you need to track something flat, like a smartphone screen, a logo on a truck, or a window in a building? This is where you put Roto Brush aside and fire up Mocha AE.
When to Choose Mocha AE for Planar Tracking
Mocha AE, the planar tracker that comes bundled with After Effects, doesn't think in terms of pixels and edges the way Roto Brush does. Instead, it tracks planes—flat surfaces in your footage. You just draw a loose shape around the surface, and Mocha analyzes the texture within it to track its movement, perspective, and rotation with incredible accuracy.
Once it's tracked, you can send that data back to After Effects as a mask or corner-pin data. This spline-based method is so much more stable and precise for rigid surfaces. Trying to use Roto Brush to isolate a flat-screen TV would be a nightmare of wobbly edges. Mocha can lock onto it in seconds.
The Future of Selection with Adobe Sensei AI
Adobe is pouring a ton of resources into its Sensei AI technology, and rotoscoping is a huge focus. We've already seen the benefits in Rotobrush 2 and 3, which use AI for much smarter propagation between frames. But the next leap will likely involve more direct, one-click selection features.
Imagine tools that can intelligently identify and segment every object in a scene—people, cars, buildings, skies—with a single command. These features are poised to make the first, most tedious step of rotoscoping almost automatic. This frees up artists to focus on what really matters: creative refinement.
Fast Anonymization with AI-Powered Services
Then there are times when the goal isn't a complex VFX composite but simple, fast anonymization. For newsrooms, security firms, or marketing teams who just need to blur faces or license plates, firing up After Effects is total overkill. This is where modern, dedicated services have become a game-changer.
A journalist on a deadline doesn't have time to manually rotoscope multiple faces in an interview. A browser-based tool like Blurit can automatically detect and blur every face in a video in seconds, right from the web.
These specialized AI services are built for one purpose: speed and compliance. They let you bypass the entire manual rotoscoping process.
- Automatic Detection: AI instantly finds faces, license plates, and other sensitive objects without any manual input.
- Browser-Based Workflow: No software to install. You just upload your file, let the AI process it, and download the result.
- Built for Compliance: Many of these services offer features like EU hosting and immediate file deletion to help you meet privacy regulations like GDPR.
For anyone whose primary need is blurring for privacy, these tools get the job done in a fraction of the time it would take to even launch After Effects. They are an invaluable alternative when speed and efficiency are everything.
Common Roto Brush Questions (and Quick Fixes)
Even a tool as powerful as Roto Brush can leave you scratching your head when you're deep in a project. Let's tackle some of the most common snags you'll run into and get you back on track.
Can I Use Roto Brush in Premiere Pro?
Short answer: no. The Roto Brush tool lives exclusively inside After Effects. It's not a native feature in Premiere Pro.
The practical solution is to use Adobe's Dynamic Link. Right-click your clip in the Premiere Pro timeline and select "Replace With After Effects Composition." This sends the clip to After Effects. Do your rotoscoping work there, save the project, and the rotoscoped clip will appear perfectly in your Premiere timeline, updating automatically if you make further changes.
Why Is My Roto Brush Tool Not Working?
This is the classic issue that gets almost everyone at first. If you're clicking on your footage and nothing is happening, you're almost certainly trying to use Roto Brush in the main Composition panel.
The Roto Brush is designed to work only inside the Layer panel. To activate it, just double-click your video layer in the timeline. This opens the clip in its own dedicated Layer view, and your Roto Brush tool will immediately become active.
Nine times out of ten, if the brush isn't painting, you're just in the wrong panel. Double-click the layer, and you're good to go. It's a simple mistake but a crucial step.
What's the Difference Between Roto Brush 1, 2, and 3?
After Effects has rolled out a few versions over the years, and the improvements are massive. Knowing the difference helps you choose the right one for the job.
- Roto Brush 1 (Classic): This was the original. It relied on pretty basic edge detection and often demanded a ton of manual frame-by-frame correction, especially with tricky subjects or fast motion.
- Roto Brush 2: This version was a game-changer because it brought in Adobe Sensei AI. The AI helps the tool actually understand the object it's tracking, which dramatically reduces the amount of manual cleanup you have to do.
- Roto Brush 3: The latest iteration refines that AI even further. It's significantly better at handling tough situations like occlusions (when something blocks your subject), fine hair detail, and motion blur. It is, by far, the most accurate and reliable version. If you have it, use it.
For tasks where you just need to anonymize faces or plates for privacy or compliance, manual rotoscoping is often overkill. If speed is your priority, a dedicated tool can be much more efficient.
Instead of painting masks, Blurit uses AI to automatically find and blur sensitive info in seconds, right from your browser. Learn more and try it for free at https://blurit.app.